Showing posts with label Wunderle Wednesdays. Show all posts

Saturday, March 9, 2013

Floral Frames Easter Basket

Floral Frames Easter Basket

I would probably say with out a doubt that Stampin' Up! framelits are my absolute fav.  So of course when I saw this basket on Brenda Quintana's blog I just knew I had to make it.  It was so cute that I decided that we would make it in class.  The girls loved it!  Like I said before my fav and I don't think I have had a class that I haven't used them in.  Can't wait for the new catalog in hopes that there will be more of them headed our way. Anyways back on to topic. Here is the basket completed.  I changed mine a bit to make it a little more sturdier. 


Ingredients:
CS - Primrose Petals, Lucky Limeade, Pool Party, Whisper White
DSP - Brights Patterned Paper, Daffodil Delight
Ink - Primerose Petals
Framelits - Floral Frames
Ribbon - 3/8" Ruffled Ribbon - Lucky Limeade, Pool Party
Punch - 1 1/4"scallop punch 
Stamp Set - Spring Sampler # 125512 (spring catalog pg. 23)
Big Shot
Simply Scored Scoring Tool

Step 1 - Using the largest flower from the floral frames framelits cut out the Primerose Petals. 
Step 2 - Using the second to largest flower cut the Daffodil Delight patterned DSP.
Step 3 - Adhere the flowers together.
Step 4 - Starting with Daffodil side up score the flower tip all the way across to the other flower tip on the opposite side. The easiest way to do this is to mark the 6" grove on your scorer at the top and then another mark just below your flower  to make lining it up easier. Do this four times all the way around your flower.
Step 5 - Flip over flower and score the indented parts of the flower all the way across just as you did in step 4.
Step 6 - Using Pool Party card stock cut out both the smallest flower framelit and the second to smallest flower framelit.
Step 7 - Take the smallest flower and adhere it to the middle of the larger flowers.
Step 8 - Fold flower like an accordion.
Step 9 - Cut a 3/8" x 8" strip of Lucky Limeade CS. This will give the ribbon strength in order to keep it's shape. 
Step 10 - Cut a 8" piece of lucky limeade ruffled ribbon and adhere it to the Lucky Limeade strip.
Step 11 - Put a piece of sticky strip on the ends of the lucky limeade strip and adhere it to the lower sides of the flower basket.
Step 12 - Adhere the second to smallest pool party flower to the bottom of the basket.
Step 13 -  Stamp your image 
Step 14 - Punch out your image using the 1-1/4" scallop circle punch
Step 15 - Punch a small hole in the top of the scallop and run the pool party ribbon through it.
Step 16 - Attach scalloped punch image to the handle of the basket.
Step 17 - To finish it off add a cellophane bag filled with treats.  


Hope you enjoyed this project and thanks for stopping by.


Wednesday, February 13, 2013

Wunderle Wednesday Class Project More Amore

Wunderle Wednesday Class Project More Amore
Finally got a picture of our last class project.  I couldn't wait to try out the Honeycomb embossing folder with the new Core'dinations card stock.  What a great effect. I did find that when sanding you have to sand very gently otherwise the paper will rip right in half. 


Ingredients:
CS - Pool Party Core'dinations, Very Vanilla
DSP - More Amore
Stamp set - That's the Ticket
Punch - Ticket Builder, Bitty Butterfly
Designer Build a Brad
Ribbon - Two tone Pink Pirouette/Rose Red, Flower Trim
Artisan Embellishment kit
Framelits - Hearts a Flutter
Ink - Pool Party, Rose Red
Stampin' Sanding System


Saturday, February 2, 2013

More Amore class projects


More Amore class projects.
What a fun night we had! I had more girls then normal which was a blast and I got to meet my newest recruit Kathy! Who also is having her first party today! WHOOT WHOOT!
To be honest wednesday day all day I was worrying how class would go since I decided to change it up a bit by setting up stations for each project. With a larger number of girls I thought it would work better that way and it did!  No one was waiting for anything and no seemed to mind moving from table to table which was my biggest concern. Everyone seemed to enjoy the projects and I would love to see them back for this months class. 
For this card I thought I would do a lot of layering to show how effective it is.


Ingredients:
CS -  real red, basic gray
DSP - More Amore
Ink - pool party, primrose petals, basic gray
Framelits - hearts a flutter, bitty banners
Ribbon - 5/8" crochet trim, 1/8" taffeta very vanilla
basic designer buttons
Stamp Sets - Hearts a Flutter, Itty Bitty Banners


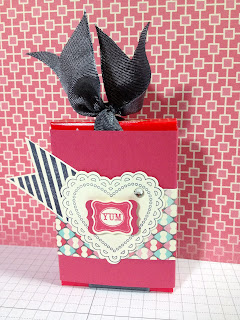
Our second project was a fun little project that I got from Pinterest posted by Heidi Boos.
It's a pull up sweetheart candy box. 


Cut CS to 6-3/4" x 3-1/4"
Cut DSP to 6" x 1-1/2"
score cs at 5/8", 3", 3-3/4" and 6-1/8"
Cut ribbon to 15", wrap around the length of the box and then double knot on the top.
Snip the tops of the ribbon in a "V". 
Place a piece of sticky strip on one end of the scored cs.
Wrap the card stock around the box and adhere together on the side.
Wrap the dsp around the middle of the candy box with the two sides that don't meet up in the front. Add embellishments to the front to cover up the dsp not meeting up in the middle. 
(Heidi figured this would maximize the full 12x12 sheet of DSP, great idea)
Ingredients:
CS - primrose petals, very vanilla
Ink - primrose petals, basic gray
DSP - more amore
Stamp Set - Hearts a Flutter, Pretty Petites
Punch - Petite Curly Label 
Framelit - Hearts a Flutter
Rhinestone - Basic Jewels
Ribbon - 1-1/4" Two Tone Basic Gray/ Basic Black

We did 1 more project that I still need to take a pic of so I will be posting that one a little later.
Thanks for stopping by!


Tuesday, October 2, 2012

Orchard Harvest


Happy Fall Y'all!
For this months class we did 3 projects all using the Orchard Harvest collection.  These little projects came out so cute!  When I first saw the Perfectly Preserved set I thought to myself I would never use that set, I'm not a canner and I'm not really into the fall thing.  BUT... after seeing this first project done by Mary Bellis I just new I had to have it.  I guess I couldn't see past the end of my nose when I first saw this cannery framelit set but this set can be used for any occasion, all you have to do is change up the DSP. 


                                           Perfectly Preserved nugget jar:
                                           CS- Very Vanilla, Raspberry Ripple
                                           DSP - Orchard Harvest
                                           Ink pad - Raspberry Ripple
                                           Framelit - Cannery Set
                                           Ribbon - Taffeta Early Espresso
                                           Big Shot, Simply scored, large oval punch, posted note
                                           
                                          The box portion that holds the nuggets is 1 1/2" x 4 1/2" 
                                                        score the 1 1/2" side at 1/4" and 1 1/4"
                                                        score the 4 1/2" side at 1 1/2" and 3"
                                                       The topover portion is 1 1/4" x 1 1/2"
                                                       score the 1 1/2" side at 1/4" and 1 1/4"

                                                       There is a great video over here on youtube.


                                        Friendship Preserves Card with a fabric flower
                                         

                                          CS - More Mustard, Raspberry Ripple, Very Vanilla
                                          DSP - Orchard Harvest
                                          Fabric - Orchard Harvest
                                          Stamp Set - Friendship Preserves, Wonderfall
                                          Framelits - Window Frames
                                          Paper Piercing pack - festive
                                          Ink Pads - Lucky Limeade, Raspberry Ripple
                                          Brush Bronzed buttons
                                          Jumbo Sticky round
                                          Bigz Die - Autumn Accents
                                          Big Shot
                                          Dimensionals

To Step this card up a notch use the woodgrain Textured Embossing folder to emboss the Raspberry Ripple CS background.


For the Fabric Flower I took one fat quarter from the Orchard Harvest Fabric box and holding it long ways vertically I did a little snip at 1".  I then tore the fabric the rest of the way.  Take that piece of fabric and tie a knot at one of the ends.  This will be your starting point.  Get your Jumbo sticky round and press the knot into the middle of the round then start twisting your fabric and then pressing it down around the knot working your way out. Once at the end of the fabric just tuck it under the fabric that's already stuck down and cut the remaining if any sticky round off and place on your project. 


Preserved Just for you Mason Nugget Jar
Ok so you don't have time to make the perfectly preserved nugget jar above here is a quick and easy alternative. In this type of jar you can put anything you like in it: pie, brownie, cookies, Jelly Beans...


Mason Jar
CS - very Vanilla
Ink Pad - Gumball Green
Fabric - Orchard Harvest
Ribbon - Sweater Trim Gumball Green
Stamp set - Friendship Preserves 
Framelits - Window Frames
Bigz Die - Scallop Circle
Big Shot


                                          Quick and easy, nothing to it!

Hope you enjoyed Wednesdays Projects!


Friday, September 7, 2012

Just a friendly reminder if you will be attending Septembers Wunderle Wednesday Stamp Class please click here to RSVP  by the 19th.  
Thanks!