Wednesday, February 13, 2013

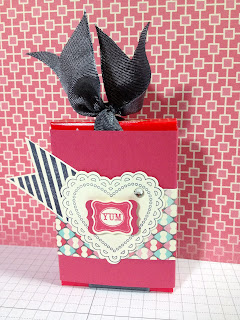
Wunderle Wednesday Class Project More Amore

Wunderle Wednesday Class Project More Amore
Finally got a picture of our last class project.  I couldn't wait to try out the Honeycomb embossing folder with the new Core'dinations card stock.  What a great effect. I did find that when sanding you have to sand very gently otherwise the paper will rip right in half. 


Ingredients:
CS - Pool Party Core'dinations, Very Vanilla
DSP - More Amore
Stamp set - That's the Ticket
Punch - Ticket Builder, Bitty Butterfly
Designer Build a Brad
Ribbon - Two tone Pink Pirouette/Rose Red, Flower Trim
Artisan Embellishment kit
Framelits - Hearts a Flutter
Ink - Pool Party, Rose Red
Stampin' Sanding System


Monday, February 11, 2013

Silver Glimmer Memorable Moments 4th Birthday Card


Silver Glimmer Memorable Moments 4th Birthday Card

Happy Birthday to my niece!  She turned the big 4 this year and she is starting to do the girl thing with all the glitter and bows.  I wanted to make her a card that would sprinkle as she would call it. I figured with all of the free Sliver glimmer paper that we were getting with our orders that I wouldn't hoard all of the sparkly paper for myself.  Four is a big number for her so I made her a full card out of the sliver glimmer paper.  


I don't know if you can see it but I ran it the glimmer paper through the honeycomb embossing folder for that extra girly pop.


Ingredients:
CS - Pink Pirouette, Rose Red, Pretty in Pink, Primrose Petals
Ink - Primrose Petals
Glimmer Silver 12x12 paper
Stamp set - Memorable Moments
Framelits - Labels Collection
Embossing folder - Honeycomb
Paper Piercing Pack - Festive
Artisan Embellishment kit
Rhinestone basic jewels
Frost white shimmer paint


Saturday, February 9, 2013

Melted Valentine Heart Crayons

Melted Valentine Heart Crayons
The kids and I saw this on Pinterest and we decided this would be part of our valentines instead of giving out chocolate.  Here is how we melted our crayons.
Pre-heat the oven to 250 degrees. While the oven is heating put your crayons into a bowl of warm water so that the paper of the crayons will peel off very easliy.


Next you will want to break up the crayons.  I tried a couple of different ways including letting the kids smash them with a hammer inside of a bag but in the end I preferred laying wax paper over a cutting board and then chopping them with a knife.  I made the pieces different sizes and we grouped them into color groups.  Lighter color for girls darker for boys.


We then put the pieces of crayons into the silicon molds that I found at Target in the $1 section.  These actually said they were for ice-cubes but I figured since they were silicon that they won't melt in the oven and they didn't.  It looks like I forgot to take a picture of this step but we just filled each one of the hearts up to the top with the broken up crayons.

Once the oven was heated to 250 I put the silicon trays onto a cookie sheet covered with wax paper (in case of spills) and placed in the oven for 15 mins. 

The wax melts in a fun, beautiful almost tie-die design.


After you take them out of the oven let them cool completely.  
Then after they are cooled pop them out of the silicon trays a there you have it.
Crayon Hearts.


This was a fun project for me and the kids to do together and can be done with any silicon form.


Kids Valentines with Heart Crayons

Kids Valentines with Heart Crayons

For this valentines day I wanted to come up with something very easy for the kids to make to give their friends for valentines day instead of candy.  Here is what I came up with.  I got the template for the valentines from remarkablycreated.com and printed them out.  The kids and I then melted some crayons down and formed them into hearts.  We choose to melt lighter colors for the girls and darker colors for the boys. I will post in another post how we melted them.  These valentines were very easy for them to make almost all by themselves and they came out very cute.  My worry now is that their friends won't realize that the hearts are crayons and not icky tasting candy! 


Ingredients:
CS: Pink Pirouette, Island Indigo, Daffodil Delight
Ribbon: Pink Pirouette grosgrain
Punch: the star from Merry Minis
Silicon heart mold tray
crayons
Clear envelopes


Tuesday, February 5, 2013

Hearts a Flutter Four Leaf Clover St. Patty's Day


Hearts a Flutter Four Leaf Clover
I saw this heart stamp used as a flower and thought how cute would it be if I used it as a four leaf clover. 
So here it is: It would be a very cute hostess gift.  My idea was to put some candy in the cello-bag but I didn't have any at the house. The kids must of eaten all! (right!) The marker worked just as good. 

Ingredients:
Stamp set - Hearts a Flutter and Itty Bitty Banners
Framelits - Hearts a Flutter and Bitty Banners
CS: Whisper White and Gumball Green
Ribbon - Gumball Green (retired)
Cello-bag


Monday, February 4, 2013

February's Best Of...

February's Best Of...25 years is out. Start your collection today! 
Remember to hang on to your 25-year proof of purchase sticker, and adhere it to your Stampin’ Up!® collectors card, which is included with each stamp set.

For every six Best of sets

you buy, you can send in your collectors card for a FREE
set of your choice valued up to $14.95!

Must be redeemed by April 30, 2014. 


Saturday, February 2, 2013

More Amore class projects


More Amore class projects.
What a fun night we had! I had more girls then normal which was a blast and I got to meet my newest recruit Kathy! Who also is having her first party today! WHOOT WHOOT!
To be honest wednesday day all day I was worrying how class would go since I decided to change it up a bit by setting up stations for each project. With a larger number of girls I thought it would work better that way and it did!  No one was waiting for anything and no seemed to mind moving from table to table which was my biggest concern. Everyone seemed to enjoy the projects and I would love to see them back for this months class. 
For this card I thought I would do a lot of layering to show how effective it is.


Ingredients:
CS -  real red, basic gray
DSP - More Amore
Ink - pool party, primrose petals, basic gray
Framelits - hearts a flutter, bitty banners
Ribbon - 5/8" crochet trim, 1/8" taffeta very vanilla
basic designer buttons
Stamp Sets - Hearts a Flutter, Itty Bitty Banners


Our second project was a fun little project that I got from Pinterest posted by Heidi Boos.
It's a pull up sweetheart candy box. 


Cut CS to 6-3/4" x 3-1/4"
Cut DSP to 6" x 1-1/2"
score cs at 5/8", 3", 3-3/4" and 6-1/8"
Cut ribbon to 15", wrap around the length of the box and then double knot on the top.
Snip the tops of the ribbon in a "V". 
Place a piece of sticky strip on one end of the scored cs.
Wrap the card stock around the box and adhere together on the side.
Wrap the dsp around the middle of the candy box with the two sides that don't meet up in the front. Add embellishments to the front to cover up the dsp not meeting up in the middle. 
(Heidi figured this would maximize the full 12x12 sheet of DSP, great idea)
Ingredients:
CS - primrose petals, very vanilla
Ink - primrose petals, basic gray
DSP - more amore
Stamp Set - Hearts a Flutter, Pretty Petites
Punch - Petite Curly Label 
Framelit - Hearts a Flutter
Rhinestone - Basic Jewels
Ribbon - 1-1/4" Two Tone Basic Gray/ Basic Black

We did 1 more project that I still need to take a pic of so I will be posting that one a little later.
Thanks for stopping by!