Sunday, June 30, 2013

Summer Bash Stampin' Up! 2013


We had a blast on Saturday!  I would say our summer bash was a big success thanks to all of you!  My up-line Andrea and my co-demo Heather made gorgeous display tables and make-n-takes!
All the things I love to do I got to do on Saturday, Stampin, chatting and making new friends! So much fun especially on a rainy day.
I can't wait for next years Summer Bash!
Enjoy the pictures!
                                            Heather at her Make-n-take table

                                            Candy Bar

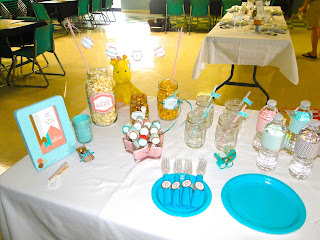
My baby shower display table


Heathers birthday party display table


Other displays


My make-n-take table


More of my baby shower display table


Our great helpers!


Andrea's 25th Anniversary Display Table


Heathers Birthday Party display table


Heathers make-n-take table


More displays


Andrea at her make-n-take table


Close-up candy bar


Our first arrivals


Working the ordering table


Welcome sign


My first make-n-takers!  They were a lot of fun!


More make-n-takers at my table.


Tuesday, June 4, 2013

2nd Annual Summer Bash Stampin' UP!


Interested in having fun on Saturday June 29th? Join us for our 2nd annual Stampin' Up! Summer Bash. Make-n-takes, games, door prizes and much more. See the flyer for details. Spread the word, everyone is invited!


Wednesday, April 17, 2013

All Dressed Up for Weddings and Anniversaries

Wow! I can definitely tell it's spring and Love is in the air with Weddings and Anniversaries happening everywhere!  How better to congratulate or send best wishes than a handmade card.

Here is another example of me saying what would I use that set for and it turning out that I love it!  Shows how much I know my own self I guess.  I loved the all dressed up framelits so much that I ran a bunch of them through and I am keeping them aside for a quick and easy to reach embellishment (I even ran some dresses through for my daughter and her projects).

The pictures really don't do these cards any justice.
This first one I made was for a country themed wedding with a boot wearing bride.


This one was made for a summer wedding using the color Pool Party.


For this card I did it like a stencil where I took the reverse of the die cut and sponged the middle.  


Ingredients:
Cs- Crumb Cake, Very Vanilla, Pool Party
Ink - Crumb Cake, Pool Party, 
Framelits - All Dressed Up
Embossing Folders - Wood grain 1st card, Elegant Lines 2nd card
Punch - Scallop Oval
Pearl Basic Jewels
Mds for the tie Fathers Day
Stamp Set - Occasional Quotes, 3rd card Memorable Moments
Vanilla Flower Trim
3rd Card - Sponge, Delicate Details Lace Tape, Primrose Petals, Pool Party Core'dinations CS

Thursday, April 4, 2013

Virtual Mystery Hostess Party! FREE SHIPPING!


What is that you said? FREE SHIPPING on ANY size order for 3 DAYS and.....

New Colors - Retiring Colors
Thats right for 3 days only April 6th - 8th Stampin' Up is offering free shipping on any order any size. This is a great opportunity to stock up on supplies. 
Join my Virtual Mystery Hostess Party for a chance to share in hostess benefits. Use hostess code NRRXAZG9 when ordering online. Have fun Now!


Tuesday, March 26, 2013

By the Tide

By the Tide stamp set "What would I use that for?" Thought never crossed my mind to order until I went to Leadership.  I saw so many ideas using that stamp set that I said to myself when I get back from Leadership that will be the first stamp set I order.  To my surprise because I went to Leadership they offered us a free stamp set and guess what was on the list? "By the Tide" so there was no question what my choice was.  I live in florida and we do a lot of fishing so this stamp set is great for men, women and even kids.  I'm loving how well it goes with all of our orange based colors that I rarely use. I also added a little shine to the floating coral by using the clear embossing powder to give it that little extra pizzaz.


Ingredients:
CS - Calypso Coral, Very Vanilla
DSP - First Edition Specialty 
Stamp set - By the Tide
Ink - Cameo Coral, Versa Mark
Punches - 1" square and 1-1/4" square
Button and ribbon - Sycamore street Bundle
Heat tool
Clear embossing powder

Friday, March 22, 2013

Paper Pumpkin

Loving Paper Pumpkin and I can't wait for my next one to arrive.  The best thing about it is that all products used are supplied right in the kit for you!


Friday, March 15, 2013

Spring is in the Air!

Are you ready for a bundle from the New Annual Catalog?  Well Stampin' Up! is with this set called Spring is in the Air.  Check out the flyer below and then click here Spring is in the Air to order yours now.  I did!
P.S.  If you don't want the bundle you can order just the stamp set. LOVE IT!


Tuesday, March 12, 2013

Soda Pop Top Lucky You MDS Pins St. Patricks Day


Since this month is my hostess month I thought I would do something special for the girls in one of the clubs I belong to.  I figured club this month is on a holiday month so what better then to do something for St. Patricks Day.  Ok now the question is what?  Dessert?  Everyone is on diets-won't be good. Hmmm drinks - SUI- stamping under the influence - might not be so good either.  How about something small and green that you can wear, incase they forget to wear there green?  A pin would be perfect!  Now do I have any stamp sets that are for St. Patty's day?  Nope but MDS does.  It is one of the new downloads from Feb. 26th.  Item number 133461 and it's only $7.95. Perfect i'm in!
Now I need something sturdy to glue the pin to.  Flatten Soda Pop Tops will work just fine.
Create in MDS, flatten pop tops, glue together and presto some of the cutest pins I have seen.  I'm probably just being partial, but hey I can do that! LOL!


Ingredients:
CS - Whisper White
Basic Jewels
Soda Pop Tops
MDS - Lucky You
Ruffled Ribbon - Lucky Limeade
Hot Glue gun
Big Shot
Pins


Saturday, March 9, 2013

Floral Frames Easter Basket

Floral Frames Easter Basket

I would probably say with out a doubt that Stampin' Up! framelits are my absolute fav.  So of course when I saw this basket on Brenda Quintana's blog I just knew I had to make it.  It was so cute that I decided that we would make it in class.  The girls loved it!  Like I said before my fav and I don't think I have had a class that I haven't used them in.  Can't wait for the new catalog in hopes that there will be more of them headed our way. Anyways back on to topic. Here is the basket completed.  I changed mine a bit to make it a little more sturdier. 


Ingredients:
CS - Primrose Petals, Lucky Limeade, Pool Party, Whisper White
DSP - Brights Patterned Paper, Daffodil Delight
Ink - Primerose Petals
Framelits - Floral Frames
Ribbon - 3/8" Ruffled Ribbon - Lucky Limeade, Pool Party
Punch - 1 1/4"scallop punch 
Stamp Set - Spring Sampler # 125512 (spring catalog pg. 23)
Big Shot
Simply Scored Scoring Tool

Step 1 - Using the largest flower from the floral frames framelits cut out the Primerose Petals. 
Step 2 - Using the second to largest flower cut the Daffodil Delight patterned DSP.
Step 3 - Adhere the flowers together.
Step 4 - Starting with Daffodil side up score the flower tip all the way across to the other flower tip on the opposite side. The easiest way to do this is to mark the 6" grove on your scorer at the top and then another mark just below your flower  to make lining it up easier. Do this four times all the way around your flower.
Step 5 - Flip over flower and score the indented parts of the flower all the way across just as you did in step 4.
Step 6 - Using Pool Party card stock cut out both the smallest flower framelit and the second to smallest flower framelit.
Step 7 - Take the smallest flower and adhere it to the middle of the larger flowers.
Step 8 - Fold flower like an accordion.
Step 9 - Cut a 3/8" x 8" strip of Lucky Limeade CS. This will give the ribbon strength in order to keep it's shape. 
Step 10 - Cut a 8" piece of lucky limeade ruffled ribbon and adhere it to the Lucky Limeade strip.
Step 11 - Put a piece of sticky strip on the ends of the lucky limeade strip and adhere it to the lower sides of the flower basket.
Step 12 - Adhere the second to smallest pool party flower to the bottom of the basket.
Step 13 -  Stamp your image 
Step 14 - Punch out your image using the 1-1/4" scallop circle punch
Step 15 - Punch a small hole in the top of the scallop and run the pool party ribbon through it.
Step 16 - Attach scalloped punch image to the handle of the basket.
Step 17 - To finish it off add a cellophane bag filled with treats.  


Hope you enjoyed this project and thanks for stopping by.


Saturday, March 2, 2013

March - Best of 25!


The new Best of 25 years March set is out with 1 of my most favorite stamps, the Hydrangea!
Click here to order yours today!
Remember to hang on to your proof of purchase sticker. For every six you collect you can send in your collectors card for a free stamp set worth up to $14.95.

Friday, March 1, 2013

Introducing Photopolymer

Introducing Photopolymer by Stampin' Up!
Brand new completely clear stamp set now available,  click here to find out more!
To watch a video and order please click here or click on the promotions tab at the top of my blog.
What are you waiting for?  Order now, I have!